Mosaic building with Rubik's Cubes
Examples for mosaic pictures
When you have many Rubik's Cubes, you can make pictures with them. For creating pictures, I'm using the free software GIMP, since it has the function to reduce the colors to exactly 6.
However, this is no explanation how to create templates but to arrange the colors on one side of the cube to a given pattern.
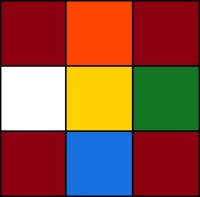
As example we're using the following pattern:
Using of the 3D models
The following 3D models can be handled as follows:
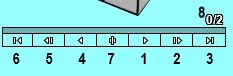
1: Play turns forward.
2: Play turns step by step by every click.
3: Set to end position.
4: Play turns backwards.
5: Play backwards step by step.
6: Set to initial position.
7: Mirror 3D model.
8: Shows progress of the turns. In the example, no (0) turn of 2 has already be done.
By clicking on a area outside the cube and dragging the mouse, you can rotate the cube.
By clicking on the cube and dragging you can turn the layers.
Attention: When scrambling the cube, it doesn't show anymore the turns as intended. By clicking on 6 you can reset the cube to its initial position.
Search center
|
|
Search for the center with the given color (in the example: yellow) and rotate the cube to get it to the top layer. Professional cubers will solve the cube from down to up to have a better overview of the unsolved parts. However, for mosaic building I recommend to hold the pattern on top. |
Arrange facelets with the right color on the edges
|
|
If the facelet with the right color is in the middle layer, you can get it to the top layer by just one turn. |
|
|
When placing the 2nd facelet, you have to pay attention to place it right in relation to the 1st facelet (in the example: green) which is already on its position. If white is your 2nd facelet, it has to be placed opposite to green. This can be reached by turning the top layer in the right direction. |
|
|
If the 2nd facelet is blue, it can be put it to the right place (next to green in clockwise direction) by just one turn in the shown situation. |
|
|
Before turning the orange facelet to top, the top layer has to be rotated by 180° to be on the right position in relation to the green facelet. |
|
|
If the desired facelet is placed on bottom (opposite to the correct position), you can bring it to top by just a 180° rotation. However, you have to turn either the top or bottom layer to get it to the right position. |
|
|
This is the most complicated case: The orange facelet is on the bottom layer, but sidewise. In this situation you need two turns to get it to the top layer in the right orientation. Before every turn you have to move the top layer to let the 3 correct facelets on its place. |
|
|
When (as in the example) all edges have different colors, you will always find a facelet in the desired color in the middle or in the bottom layer. However, if not all facelets have the same color, it could be the case that the only remaining facelet in the right color is in the top layer, but sidewise. In this case you can get the (in the example: white) facelet to the middle layer by a 90° rotation. Now you have one of the cases which is already explaned above. |
Arrange facelets on the corners
|
|
The red facelet has to be placed to the position which is marked in dark grey color. This could be done by just one move. However, you would move the blue facelet away with this turn. The trick is to get both the start (red) and the target (dark grey) position to the bottom layer by a 90° turn. Now you can get the red facelet to the target position by a rotation of the bottom layer. After that you just have to reverse the first move. |
|
|
This is the mirrored case as shown above. You also need only 3 turns to get the red facelet to the right position. Before that you just have to turn the top layer to get it on a place where you don't have already placed a red facelet. In the example you just have to pay attention to get the red facelet to a position where's not already another red facelet. If you have corners with different colors, you have to take care to get the facelet on the right position in relation to the other facelets (just like it is the case for the edges). |
|
|
This is the most complicated case when arranging the corner facelets: The red facelet is on the bottom layer facing downward. In this case (after you turned the top layer to have the red facelet just below the target position) you have to do 3 similar turns as shown above, but with the difference that your middle turn is a 180° turn. Thereby the red facelet will stay on the bottom layer, but now in a sideward orientation. Now you have a case as already shown above. |
|
|
Especially when all corner facelets have the same color (as in the shown example) it can be the case that the only remaing facelet in the right color is already on the top layer, but sideward. In this case you have to get it down with 3 moves but in a way that it is not facing downward after that. Now you have a case which you should already know. You can get the red facelet on the right position by 3 more moves (but mirrored and in reverse order to the first 3 moves. |
Examples for mosaic pictures
|
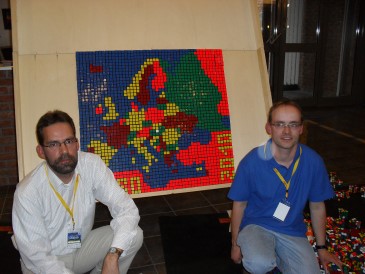
Speedcubing EC 2010 in Budapest Event: Mosaic Building Theme: Europe Theme created by: Oliver Wolff Mosaic built by: Oliver Wolff, Markus Pirzer Ranking: 1st place |
|
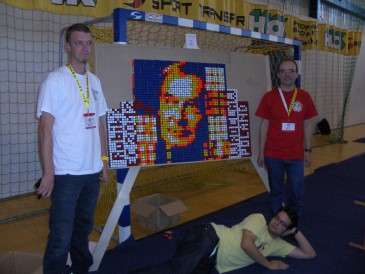
Speedcubing EC 2012 in Wroclaw Event: Mosaic Building Theme: Erno Rubik Theme created by: Thomas Stadler Mosaic built by: Thomas Stadler, Stefan Huber, Markus Pirzer Ranking: 3rd place |
|
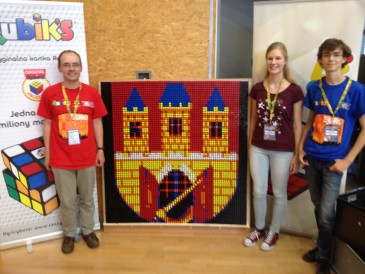
Speedcubing EC 2016 in Prague Event: Mosaic Building Theme: City arms of Prague Theme created by: Markus Pirzer Mosaic built by: Pia Melloh, Malte Ihlefeld, Markus Pirzer Ranking: unknown (only rankings 1-3 were published) Cubes supplied by: RubiART |
|
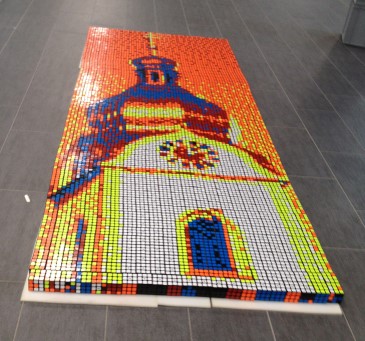
Schwandorf Open 2017 Theme: Steepletop of Saint Jakob Church Schwandorf Theme created by: Markus Pirzer Mosaic built by: Teilnehmer Schwandorf Open 2017 Cubes supplied by: Thomas Stadler |